
In July it was time to get back to designing and 3D printing some more math models. I had previously seen some beautiful models printed by Dave Pfaff on the Series 1 Pro, using its ability to print in a spiral. I wanted to print a large hyperboloid of one sheet using this printing technique.
So I went back to Cinema4D to design the model. I used the Function tool to make the hyperbola \(\frac{x^2}{4} -\frac{y^2}{9}=1\), which has asymptotes \( y=\pm \frac{3x}{2}\). I then used the Lathe tool to revolve the hyperbola around the \(y\)-axis and create a hyperboloid of one sheet. I knew, from the asymptotes, that the surface would have an angle greater than \(45^\circ\) angle with the \(xz\)-plane. (Recall that in Cinema 4D, the \(y\)-axis points upwards where the \(z\)-axis usually points in mathematics.) Having a steep angle with the plane is important feature when 3D printing in a spiral. Since there won’t be any supports printed, a steep angle increases the chances of a good print.
At this point I used the surface I had created to make two different kinds of models. For the first model, I simply added a top and bottom to create a closed volume. For the second model, I thickened the surface using the Extrude tool (2mm), again creating a closed volume. The extruded surface had raised top and bottom rims, which meant the model would not sit flat. So I selected all the point around the top (respectively bottom) rim and brought them down (resp. up) an appropriate distance. Apart from this, this thickened model needed very little doing to it. I then created a third model by adding equations and removing them from the thickened surface. This ended up being quite involved as I used the Bend Tool to make sure the equations sat nicely on the surface.
 In order to get a spiral print, I took the first closed model, and adjusted the print settings on the Series 1 Pro printer. The top and bottom layers of the model are not printed; instead the nozzle goes around in a spiral, printing the surface 1 layer thick. Initially, we had trouble with both the fan and print speed settings. This meant the filament was not setting at the bottom of the model, leaving a gaps and giving a ragged appearance. After we slowed the print speed down and made sure the fan turned on after 1mm (rather than after 10mm), the prints turned out beautifully. The small model is about 13cm tall, and the large one about 20cm tall. These models can be found on Thingiverse here.
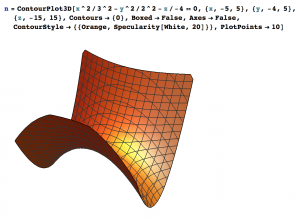
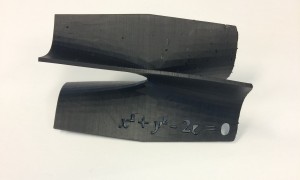
The next set of models was the hyperbolic paraboloid again, but this time I wanted to surface to look more like a saddle shape. To achieve this I went into Mathematica and use ParametricPlot3D command to plot the surface \(z=x^2-y^2\). Instead of displaying it inside a box, I had Mathematica just show the part of the surface inside the circle \(x^2+y^2=1\). To do this, I used the RegionFunction command.


I exported the Mathematica file as a .wrl to Cinema4D. Once there, I extruded the surface (again 2mm thick), then had to spend a significant amount of time repairing the mesh. To do this, I used the Optimize function, and also went around the surface repairing the mesh by hand (removing points, lines and faces, then using the Fill Polygon Hole tool to repair the gaps). I made two copies of the model, one with equations and one without. (I also built the equations in Cinema4D and extruded them. I then removed them from the surface using the Boole tool.) I 3D printed the resulting models on the FormLabs Form 1+ printer in clear and grey resin. The surfaces printed very well, though there were a fair number of supports to remove.
 These models can be found on Thingiverse here.

 t failed a few of times due to a tangled filament
  I used the FormLabs printer to create a model of a space curve from Stewart’s Essential Calculus (Section 10.7, exercise 18). The first challenge was to draw the object in Cinema 4D without a self-intersection (3D printers do not accept intersecting geometry). Professor Denne suggested that I make two half-curves that intersect, then make a Boolean out of them. The suggestion worked, so I was then able to put text onto it. It was tricky to figure ou


 o the inputs \(x(t),\, y(t)\), and \(z(t)\). For the first
  th
th 


 I also had to reverse the normals on half of the object to make sure they were all aligned with the other half before I extruded the surface. I optimized the polygons to be sure the edges joined up into one object. I then extruded the surface to create my hyperboloid of two sheets. I copied this and put equations through one of them. I also made sure to Boole the edges of the hyperboloid to make them flat for printing.
 Once I had done this I did the same thing with the optimize tool in Cinema 4D to see how big I could make the polygons before the surface started to lose accuracy. The first time I went through all these steps the hyperbolic paraboloid I had chosen just didn’t work correctly. So, I went back to the beginning and created a new Mathematica file of a hyperbolic paraboloid, and spent some time deciding where to cut it off to create edges that were as straight as possible.


 Then I optimized the object by 0.02cm. With the first cone I made I reversed the normals so they were facing outwards from the cone surface. When I extruded the surface by 0.25cm this automatically gave center of the object more thickness. Unfortunately I realized that while it gave the center thickness, it also offset the lines of the cone so they didn’t match up, which is not what we wanted. In order to fix this problem I did the same thing but did not reverse the normals (so they were facing the inside) and extruded the surface to give the cone thickness.

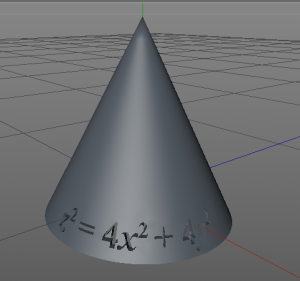 In order to do this I used the same formula spline except this time from only \(t=-2\) to \(t=0\) and copied and rotated it to create the second half. On one half I put the equation for the cone \(\frac{z^2}{4}=x^2+y^2\) and immediately ran into trouble. I had used too many subdivisions (72) and the object was not accepting the Boole with the equation. After creating many different cones with different subdivisions I found that 60 worked. Once this problem was solved I added the equations to one of the halves of my cone and printed it. When I added the equation I put it all the way through the surface and not just imprinted on it since the object had very little thickness to it.


 The first print I did of the ellipsoid I cancelled the print early on so that I could inspect the sides. The surface looked a bit melty, where the filament had shrunk. We decided this was fine and to try to print it again.
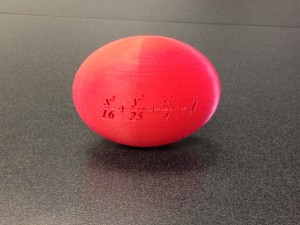 This time when I printed it I decided to put the equations on the top of the ellipse and use a raft. It printed perfectly.
 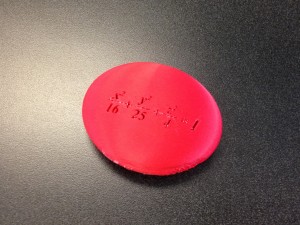 After my success with my second ellipsoid I decided to try to print my first ellipsoid again and this time with a raft. The object never fell over and printed perfectly. These ellipsoids can be found on Thingiverse