An example of a hyperboloid of one sheet.
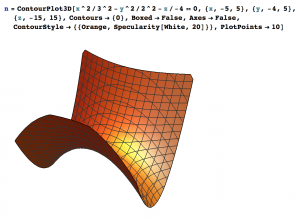
Some of the most interesting quadratic surfaces are the doubly-ruled surfaces: the hyperboloid of one sheet (like x2+y2-z2=1) and the hyperbolic paraboloid (like z=x2-y2). These surfaces have made an appearance in this blog previously when we discussed how to create good 3D printable models of these surfaces.

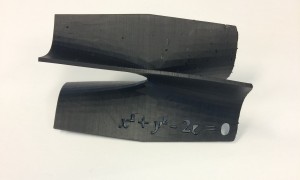
An example of a hyperbolic paraboloid.
Ruled surfaces have been studied extensively in geometry. Formally, a ruled surface is a surface which is a union of straight lines. The straight lines are called rulings (or the generators) of the surface. An example to think about is a cylinder: this is a union of straight lines, each of which intersects a circle. Just as with the circle and the cylinder, in a general ruled surface there is a curve in space which intersects each of the lines. Thus the surface can easily be parametrized as follows. Let g:(a,b)->R3 be a parametrization of the curve on the surface, let vt be a vector at point g(t) which points in the direction of the line passing through g(t). Then the surface is parametrized by f:(a,b)x(c,d)->R3 defined by f(t,s) = g(t)+svt.

A helicoid. Image from https://minimalsurfaces.blog/
A nice example of such a surface is the helicoid where lines parallel to the xy-place pass through each point of a helix (for example parametrized by g(t)=(cos(t), sin(t),t)). One possible parametrization of a helicoid is f(t,s) = (s.cos(t), s.sin(t), t). Ruled surfaces are very familiar to us, if the rulings are all parallel to each other, then the ruled surface is a generalized cylinder. For example, the surface given by y=x2 in R3 is a generalized cylinder parametrized by f(t,s)=(t,t2,s).

The two rulings on a hyperbolic paraboloid surface.
Now there are surfaces which are doubly-ruled surfaces, meaning that each point of this surface belongs to two distinct lines. In other words, this surface has two distinct rulings. You can use projective geometry to show that this surface, the plane, and the hyperboloic paraboloid are the only surfaces that have this property. Robert Byrant has a nice proof of this fact using differential geometry in a 2012 Math Overflow post
Let us focus our attention on the hyperboloid one sheet given by x2+y2-z2=1. To give explicit equations for the two rulings, I will follow the text Elementary Differential Geometry by Andrew Pressley. For every t, we can show the straight line Lt given by \[(x-z)\cos t=(1-y)\sin t, \ \ \ (x+z)\sin t = (1+y)\cos t\] lies on the surface. To see this, multiply the two equations together to get \[(x^2-z^2)\sin t\cos t =(1-y^2)\sin t\cos t.\] in other words x2+y2-z2=1 unless cos(t)=0 or sin(t)=0. If cos(t)=0, then x=-z and y=1, and if sin(t)=0 then x=z and y=-1, and both of these lines lie on the surface. A short computation reveals that for each t, line Lt contains the point (sin(2t),-cos(2t), 0) and is parallel to the vector (cos(2t), sin(2t), 1). We thus get all lines in one ruling for t in [0,π).

One set of rulings on a hyperboloid of one sheet.
We now show that any point on the hyperboloid lies on one of these lines. Take a point (x,y,z) on the surface x2+y2-z2=1. If x does not equal z, then let t be such that cot(t) = (1-y)/(x-z). If x does not equal -z, then let t be such that tan(t) = (1+y)(x+z). In both cases the point is on Lt. The only cases left are the points (0,1,0) and (0,-1,0). But these points lie on the lines Lt when t=π/2 and t=0 respectively. In addition, we can check that the lines in this ruling do not intersect. Suppose (x,y,z) lies on Lt and Ls and t does not equal s. Then \[(1-y)\tan t = (1-y)\tan s, \ \ \text{and} \ \ (1+y)\cot t = (1+y)\cot s.\] Assuming the tan and cot functions are not zero or undefined gives both y=1 and y=-1, a contradiction. The case where t=0 and s=π/2 give disjoint lines too: \[ L_0(t) = (t,-1,t) \ \ \text{and} \ \ L_{\pi/2}(s)=(-s,1,s).\]
What is the other ruling? For every t, we can show the straight line Ms given by \[(x-z)\cos s=(1+y)\sin s, \ \ \ (x+z)\sin s = (1-y)\cos s\] lies on the surface. The computations are almost identical, so we omit them. Each point of the surface lies on a line in Ms and the lines in this ruling do not intersect.

The second set of rulings on a hyperboloid of one sheet.
Another computation shows that if t+s is not a multiple of π, then Lt and Ms intersect in the point \[\left( \frac{\cos(t-s)}{\sin(t+s)}, \frac{\sin(t-s)}{\sin(t+s)}, \frac{\cos(t+s)}{\sin(t+s)} \right). \] For each t in [0,π), there is one s in [0,π) such that t+s is a multiple of π, and the lines Lt and Ms do not intersect. Intuitively, the two lines are on opposite sides of the hyperboloid of one sheet.
There are many other interesting observations to be made about these surfaces. For example, any set of three skew lines generates such a surface and the three skew lines lie in one of the rulings. Ian Agol posted a nice proof of this in the same 2012 Math Overflow post.


 Once I had done this I did the same thing with the optimize tool in Cinema 4D to see how big I could make the polygons before the surface started to lose accuracy. The first time I went through all these steps the hyperbolic paraboloid I had chosen just didn’t work correctly. So, I went back to the beginning and created a new Mathematica file of a hyperbolic paraboloid, and spent some time deciding where to cut it off to create edges that were as straight as possible.