 Two posts ago, I described my wonderful visit to the Double Helix STEAM school in Athens GA. My goal was to explore hyperbolic planes with the students. They can be hard to understand and visualize, so I thought I’d write another post with some further musings.
Take a piece of paper, and place the it on a flat surface like a table (or wall or board, or something). Notice that each point on the paper is above exactly one point on the table. Now take a ball (or something round – like the top of your head). Try do do the same thing with the paper. What do you notice?
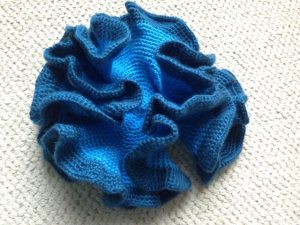
You will notice that the paper needs to be creased in order for it lie smoothly against the ball. If you want to have exactly one point on the paper above one point on the ball, then you will need to remove some paper. The crocheted hyperbolic plane shown above is the exact opposite. There is “too much” plane for the paper. In order to have exactly one point on the paper above one point on the hyperbolic plane, then more paper needs to be added.
It is this idea of removing and adding paper that allows us to construct paper models which approximate spheres and hyperbolic planes. The plane can be thought of as being tiled by hexagons, like a honeycomb. Now, replace one of the hexagons with a pentagon. If you keep doing this in the right way, you’ll end up with a soccer ball shown on the left below. There, each pentagon is surrounded by hexagons. Since hexagons have been “removed” (in comparison with the planar honeycomb), the surface curves inwards and around creating a spherical shape. If, on the other hand, you replace a pentagon with a heptagon (7-sides) and surround it by hexagons, then “extra” hexagons have been added. The surface will open up and will approximate a hyperbolic plane, as shown below on the right.

The mathematical notion of intrinsic curvature is what lies behind these shapes. Spheres have positive curvature, planes are flat (zero curvature), and hyperbolic planes have negative curvature. Many people have written wonderful explanations of these ideas. I’d like to just focus on just one consequence. At the end of this post I’ve included a list of resources where you can read more.
Let’s start by thinking about flat surfaces and traditional Euclidean geometry which we all learned (and forgot!) in school. There we learned that the angle sum of the interior angles of a triangle is \(180^\circ\). That is \(\angle A+ \angle B + \angle C=180^\circ\), as shown on the right in the figure below. In order to understand what happens on other surfaces, we need to understand triangles. These are geometric figures where three points, the vertices, have been joined by three straight-lines or geodesics.
 On the sphere, it turns out that “straight lines”, or geodesic lines, are sub-arcs of great circles. These are circles formed by the intersection of the sphere with a plane through the center of the sphere. For example, if we think of the earth as a sphere, then the equator and lines of longitudes are all examples of geodesic lines. However the other lines of latitude are not geodesic lines, since they are the intersection of the sphere/earth with planes that do not go through the center of the sphere. In the figure above, you can see a spherical triangle with one side part-way around the equator and the other two from the north pole to the equator. Angles \(\angle A\) and \(\angle C\) are both \(90^\circ\), and \(\angle B\) is also \(90^\circ\). This means that \(\angle A + \angle B + \angle C = 270^\circ>180^\circ\)! Indeed, for any spherical triangle the sum of the interior angles is bigger than \(180^\circ\), that is \(\angle A + \angle B + \angle C >180^\circ\).
Can you see that the red spherical triangle bounds two areas? (One smaller obvious one, and the larger one on the rest of the sphere.) Can you work out what is the largest possible sum of interior angles of a spherical triangle? It turns out that small spherical triangles approximate planar triangles, so their interior angle sum is close to, but still greater than \(180^\circ\).
 What about hyperbolic triangles? Turns out you can create them on a crochet model by sewing straight lines for the triangle sides, as shown on the left. Hyperbolic triangles are “skinny”; the sum of the interior angles is less than \(180^\circ\). In the triangle shown below, you can clearly see the interior angles are small and their sum is much less than \(180^\circ\). As in the spherical case, small hyperbolic triangles are approximately planar; here the interior angle sum is close to, but still smaller than \(180^\circ\). Amazingly, the area of hyperbolic triangles whose vertices approach infinity is finite. The proof of this result can be found in any undergraduate textbook on hyperbolic geometry.
 I promised to include some references, and here they are.
Two of my favorite undergraduate texts include:
Post Script:  When crocheting these hyperbolic planes I weighed out three balls of the same yarn in different colors. Since the length of yarn was approximately the same, the number of crochet stitches were approximately the same, and hence the area made was the same. Pretty amazing to think that the blue area and the green area around the edge are the same! It just shows how much extra fabric is created as the hyperbolic plane is crocheted.

 One of my favorite mathematical models is the Five Intersecting Tetrhadra model. I first became aware of this model from Thomas Hull, a mathematician at Western New England University. He has written extensively about mathematics and origami (check out his book Project Origami). In particular he has written fantastic instructions for creating this model using modular origami.
  The five intersecting tetrahedra model is based on the dodecahedron. This one of the five classic regular polyhedra consisting of 12 pentagonal faces and 20 vertices. Take 4 vertices in the dodecahedron which are the same distance apart. These form the 4 vertices of a regular tetrahedron, as shown on the right (figure from Tom). Since the dodecahedron has 20 vertices, we can inscribe 5 such tetrahedra inside the dodecahedron.
  The origami version comes about by making a thin frame for each tetrahedron. Provided the frames are thin enough, they won’t intersect each other. Instead they will form a marvelous interwoven pattern. As shown on the left, I have successfully followed Tom’s instructions for making the origami version of this model.
  I used crsfdr’s model Interlocking Pyramids from Thingiverse to print the model on the UPrint SE printer at W&L. The photo at the top shows the finished version. The one to the right shows the model just out of the printer before the supports have been removed. Since the supports are made of a material that dissolves, the UPrint was the perfect printer for the job.


