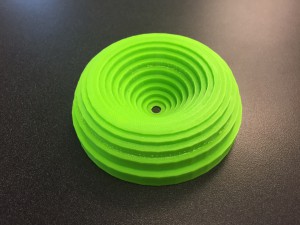
Solid of Revolution – Comparing Methods #2


To get my solid, I rotated the area between the curves \(y=x\) and \(y=x^2\) around the line \(y=1.25\).  I then approximated it by cylindrical shells.  The width of each of my shells was 1/16 and the height was \(x^2-x\), where the \(x\)-value was chosen from the right endpoint of each interval.  

One of the issues with the print comes from the fact aht  the top shell does not connect smoothly to the shell below it.  Initially I thought that this resulted from an error in the printer.  When I looked at the Cinema 4D file, however, I discovered that the top shell does not make contact with the shell below it because its height is less than 1/16 (the bowl shape is very flat there).  Additionally, the shell second from the top does not make contact with the shell below it, but the height difference is not noticable.  Another issue with the print was that the leftover supports look bad.  The inside of the object was filled with them, and even after clearing out most of the supports, it still looks terrible.  We are thinking about printing the object on a different printer, such as the Form Labs printer (which uses stereolithography) or the ProJet 260 (which uses powder), in order to get the inside part of the object to look clean.

Solid of Revolution – Comparing Methods #1

We decided to find a solid of revolution for which both the washer method and cylindrical shell method worked and to model it with both methods. Laura Taalman has done similar designs for shell approximations which can be found here and here

We decided to rotated the area between \(y=x\) and \(y=x^2\) about the line \(y=1.25\). This created a bowl-like object which is curved on the outside, straight on the inside and with a hole at the bottom of the bowl. We split this project up and I created a model of the object using the washer method, while Ryan used the cylindrical shell method. We planned to each use 16 slices/shells so we could compare our two models later.

Creating this object was a very similar process to that of creating the sphere with washers. Since I was using 16 washers and the object has a height of 1, each washer was 1/16 thick. In Cinema4D I used the preprogramed tube object and made each of them to have a height of 1/16. In order to calculate the inner and outer radius of each washer I used the value of middle of each washer, 1/32, 3/32, 5/32, 7/32, etc. I plugged these values into the equation \(f(x)=1.25-x\) for the inner radius value and \(g(x)=1.24-x^2\) for the outer radius value. The only other thing I had to change for each was was its height coordinate. My washers in Cinema4D were parallel to the \(xz\)-plane so I adjusted each washer’s \(y\)-coordinate so they would be spread out to the correct height. I increased the \(y\)-coordinate of each was by 1/16 (the height of each washer) from the previous. 

Since I used the preprogramed tube object I was unable to use Magic Merge easily to connect these object and instead just used the ‘Connect + Delete’ command under the ‘Mesh’ tab. This means that there are inner walls in my object, but since each washer is relatively small this is not hugely problematic and adds extra support.

I ran into one issue when I was finishing up with my object. The smallest washer (and the last one I created) did not touch the previous washer. Screen Shot 2015-06-23 at 3.09.54 PMAll the other washers had been able to lie on top of the previous one since their outer radius was larger than the inner radius of the previous washer. The 15th washer had an inner radius of 0.34375 cm and the 16th washer had an outer radius of 0.31152cm and thus there was a gap. This is due to the fact the bowl is very flat at the bottom.

We decided to remedy this we would just delete the 16th washer and make a note of it here as well as in the description of the object on Thingiverse.

We printed Ryan’s object with cylindrical shells using the Makerbot and the supports on the inside were difficult to remove and didn’t look good. We are currently discussing printing on another printer for these objects and I will update later on how that goes!

Volume by Cylindrical Shells

shells_1On Monday, June 15, I modeled a volume by cylindrical shells from Calculus II.  I used Example 1 in 7.3 of Stewart’s Essential Calculus, which is a volume of revolution of the curve \(y=2x^2-x^3\) about the y-axis. This is shaped a bit like a stadium. The plan is to approximate this volume using 16 cylindrical shells. I first sketched out the curve in 2-dimensions to get a feel for the profile of the shape. Next, I wrote out each point on the curve from \(x=0\) to \(x=2\) in intervals of length 1/8, namely \((0,0), … , (1.875,0.439), (2,0)\).

Each cylindrical shell is determined by its height, the thickness of the shell and either the inner or outer radius. By construction, each shell has thickness 1/8 and for each \(k=0,1,2, \dots, 15\), the inner radius of a shell is \(k/8\), while the outer radius is \((k+1)/8\). I chose the height of each shell to be \(f(k/8)\), which is the the \(x\)-value closer to the origin.

To summarize, if \(r=\)inner radius of shell, \(R=\)outer radius of shell, and \(h=\)height of tube, then for \(k = 0, 1, 2, \dots , 15\),

$$r = k/8,  \quad R = (k+1)/8,  \quad h=2r^2 – r^3.$$

Since the height function is increasing between \(x=0\) and \(x=4/3\), the cylindrical shells lie inside the volume of revolution. Between \(x=4/3\) and \(x=2\), the function is decreasing and the shells lie outside the volume.

shells_2I then made a model of this Riemann approximation for the solid in Cinema 4D by inserting tubes (Cinema 4D’s name for “cylindrical shells”) of inner radius \(r\), outer radius \(R\), and height \(h\). When Cinema 4D inserts a tube, it places half of the tube above the \(xy\)-plane (the \(xz\)-plane in Cinema 4D) and half of it below. Therefore, I needed to add half of each tube’s height to put each shell onto the \(xy\)-plane.

The object was first printed with the supports setting on just in case, although I thought that they did not need supports. The result was that a couple superfluous strands of plastic running along the shells, which needed to be removed. Given the geometry of the shape, I would advise against using supports in building this object.

I would advise that you use a raft to build this object, however, because it was very difficult to remove the object from the build plate. (It took 5 minutes of very careful tugging by David Pfaff.)

You can find this objects on Thingiverse here.