Written by Elizabeth Marshall, Mason Shelley, and Libby Kerr (students in Math 383D Knot Theory Spring 2023).
We built different models depicting how the figure-8 knot 41 is achiral, meaning the knot is equivalent to its mirror image. In this case, if we were given a knot diagram, its mirror image would be the same diagram with swapped crossings. We observe some knot theory facts: the figure-8 knot (41) is a 1 component alternating knot with a crossing number of 4 and an unknotting number of 1. The crossing number of a link is the minimum number of crossings needed in a diagram, and the unknotting number is the minimum number of times the knot must pass through itself before it becomes the unknot. While the knot looks trivial, its composition is surprisingly difficult to model.
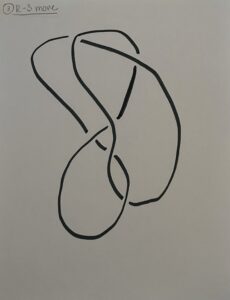
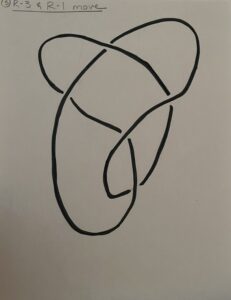
Starting with a mirror image of the figure-8 knot (Step 1 below), each of the subsequent steps shows one or two R-moves that lead the knot back to its original state. An R-move is a simple manipulation of a piece of the knot in space, where a series of them can result in significant alteration of the knot. The steps are as follows:

Step 7: Flip the figure in Step 6 180 degrees. This move reveals the figure-8 knot with crossings that are the opposite of those seen in Figure 1.
We used Cinema 4D to develop our models. On this software, we used the drawing tool to build our original knot shown in Step 1. To draw the subsequent steps representative of the R-moves we manipulated the knot from the previous step, scaled it appropriately, and checked to make sure all crossings were correct.
Using new software presented numerous challenges that we faced throughout the project. We initially found parametric equations on Wikipedia for the figure-8 knot that resulted in the wrong knot when visualized in Mathematica and then resulted in a simple line in space when entered in Cinema 4D. This meant that the this parameterization was not going to work. Without these equations, we were forced to draw the knot using the spline pen. It took nearly 10 attempts to draw the first image of the knot but eventually, we made a cohesive, recognizable figure-8 knot.
Using this tool, created one big challenge with regards to placing the points for future manipulation during the design process. Our most successful strategy was to draw the structure of the knot in 2D (holding the z-axis flat) and manipulating the points to create the over/under crossings after the knot was drawn.
Another challenge was figuring out how to properly demonstrate the transition of the knot’s mirror image back to its original state. In order to make the manipulations clear, we made a video showing the use of R-moves to visualize how the diagrams were interconnected.
Towards the end of our design process, we decided to take out the 6th step (shown above) because there was too much similarity between steps 6 and 7 (final model); that is why you’ll see 7 steps and only 6 models.
Overall, the main challenge that we ran into was using the software and properly putting our ideas into the diagrams. A massive help to our group was Dave Pfaff (IQ Center WLU), who is the expert that helped us navigate Cinema 4D. Thank you so much Dave, all of your help is greatly appreciated.


